Deploying a Linux EC2 Instance with Hashicorp Terraform and Vault to AWS and Connect to Everpure Cloud Dedicated
Another update to my “Terraforming AWS” series is the ability to deploy a Linux based Instance and connect to an existing data volume sitting on the Everpure Cloud Dedicated. This post will cover how to setup your environment and deploy and bootstrap your linux instance to connect via ISCSI.
Overview
If you are not familiar with the Everpure Cloud Dedicated, it is a purpose build block storage system that currently sits in AWS. There are many benefits and use cases you can find out here.
Today customers wonder once the data is in the Everpure Cloud Dedicated, how can they rapidly stand up a system and gain access to this data? This blog will cover a piece of automation I am now using to stand up an EC2 instance, configure it with iSCSI and get access to my data.
Pre-Requisites
- This is used to store the AWS access and secret key securely.
- This is used to automate the provisioning using a Terraform .TF file.
- This is the infrastructure to run the EC2 virtual machines.
Setup and Addition of AWS Secrets to Vault
Since I am running this on MacOS. I used brew to install Vault
brew tap hashicorp/tap
brew install hashicorp/tap/vault
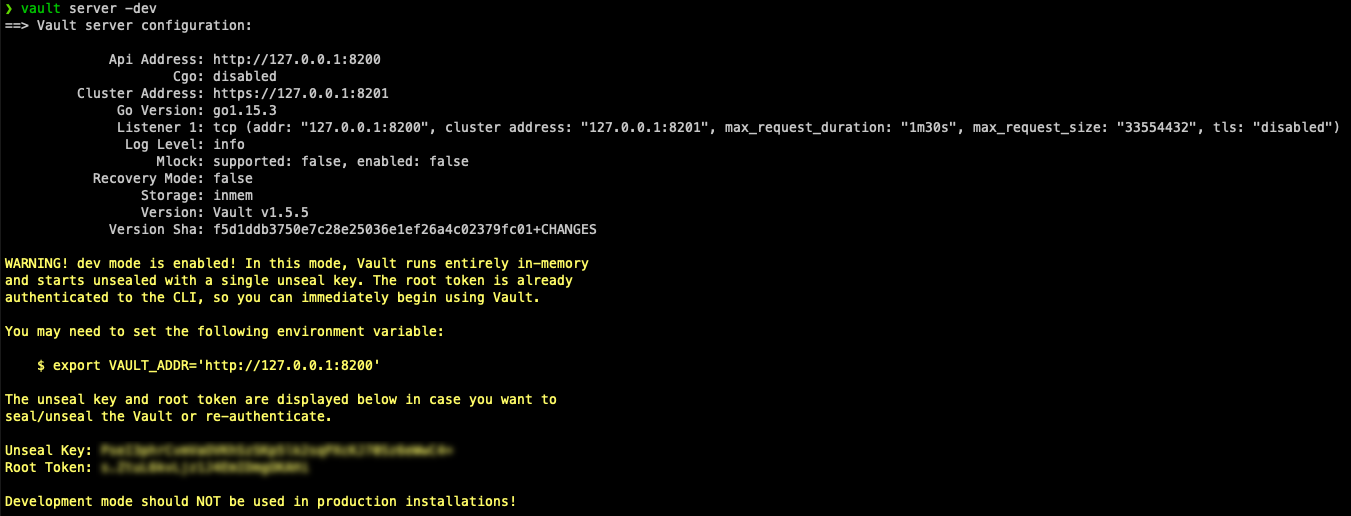
Once Vault is installed, you can run the server locally. This will provide you the environment variable to use and provide the unseal key and root token.
Since I am using this for a lab, I am using the built in vault dev server. This should not be used for production!
vault server -dev
To add your AWS secret key and access key to the vault, run the following command
export VAULT_ADDR='http://127.0.0.1:8200'
vault kv put secret/<secretname> secret_key=<secretkey> access_key=<accesskey>

Terraform Manifest Configuration
Download the sample manifest from GitHub and update the variables for your environment. This includes the Vault Token and Secret Name, and the AWS Region, AMI, Instance Type, VPC Security Groups, Subnet ID, KeyPair and Instance Name.
provider "vault" {
    address = "http://localhost:8200"
    token = "<unsealtokenfromvault>"
}

data "vault_generic_secret" "aws_auth" {
    path = "secret/<keyname>"
}

provider "aws" {
    region = "us-west-2"
    access_key = data.vault_generic_secret.aws_auth.data["access_key"]
    secret_key = data.vault_generic_secret.aws_auth.data["secret_key"]
}

data "aws_ami" "linux" {
    owners      = ["amazon"]
    most_recent = true
    filter {
        name   = "name"
        values = ["amzn2-ami-hvm-2.0*"]
    }
    filter {
        name   = "architecture"
        values = ["x86_64"]
    }
}

resource "aws_instance" "linux" {
    ami           = data.aws_ami.linux.image_id
    instance_type = "t2.micro"
    vpc_security_group_ids = ["sg-id1","sg-id2","sg-id3"]
    subnet_id = "subnet-id"
    key_name = "keypair"
    tags = {
        Name = "instance_name"
    }
    user_data = <<EOF
        #!/bin/bash
        yum update -y
        yum -y install iscsi-initiator-utils
        yum -y install lsscsi
        yum -y install device-mapper-multipath
        service iscsid start
        amazon-linux-extras install epel -y
        yum install sshpass -y
        iqn=`awk -F= '{ print $2 }' /etc/iscsi/initiatorname.iscsi`
        sshpass -p pureuser ssh  -oStrictHostKeyChecking=no pureuser@<ctmgmt-vip>> purehost create <hostnameforpure> --iqnlist $iqn
        sshpass -p pureuser ssh  -oStrictHostKeyChecking=no pureuser@<ctmgmt-vip> purehost connect --vol <purevolname> <hostnameforpure>
        iscsiadm -m iface -I iscsi0 -o new
        iscsiadm -m iface -I iscsi1 -o new
        iscsiadm -m iface -I iscsi2 -o new
        iscsiadm -m iface -I iscsi3 -o new
        iscsiadm -m discovery -t st -p <ct0-iscsi-ip>:3260
        iscsiadm -m node -p <ct0-iscsi-ip> --login
        iscsiadm -m node -p <ct1-iscsi-ip> --login
        iscsiadm -m node -L automatic
        mpathconf --enable --with_multipathd y
        service multipathd restart
        mkdir /mnt/cbsvol
        disk=`multipath -ll|awk '{print $1;exit}'`
        mount /dev/mapper/$disk /mnt/cbsvol
        EOF
}

output "public_dns" {
    value = aws_instance.linux.*.public_dns
}
output "public_ip" {
    value = aws_instance.linux.*.public_ip
}
output "name" {
    value = aws_instance.linux.*.tags.Name
}
Run the Terraform Manifest
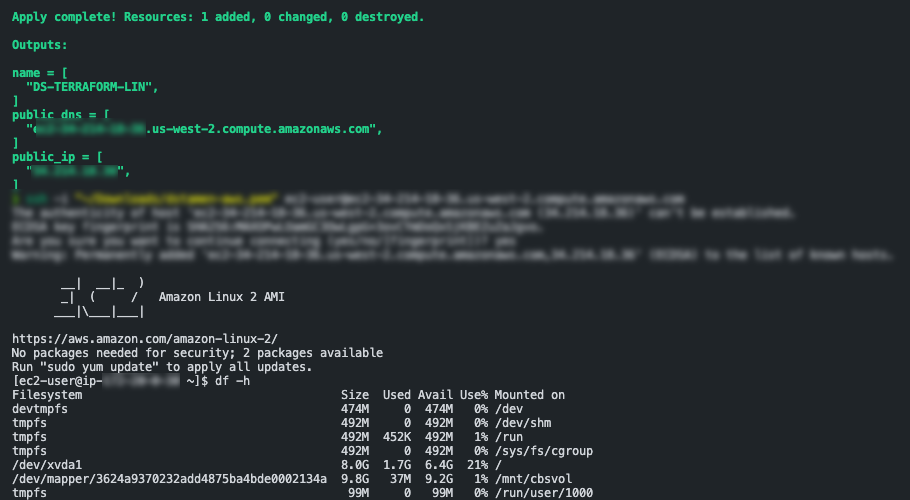
Run terraform init to install any needed providers, terraform plan to make sure all the connectivity is working and then terraform apply to deploy!
terraform init
terraform plan
terraform apply
If everything is successful your EC2 instance should be deployed in ~ 2minutes and after a reboot or two will be fully configured and running!
Viewing your Everpure Cloud Dedicated data
In my example I already had a volume provisioned with the data on my Everpure Cloud Dedicated. Within the script I create a new Pure Host object and connect it to the existing volume, configure iscsi and then mount the disk. This just shows what type of automation is possible when managing or deploying workloads in the cloud!

Closing
Hopefully this helped you get started with automating EC2 instance deployment with Terraform!
Any questions or comments? Leave them below.
comments powered by DisqusSee Also
- Deploying a Windows EC2 Instance with Hashicorp Terraform and Vault to AWS
- Deploying a EC2 Instance with PowerShell to AWS
- Deploying a Windows Azure VM with Hashicorp Terraform to Microsoft Azure
- Running vVols in VMware Cloud on AWS (VMC) on Everpure Cloud Dedicated (EC Dedicated) on AWS
- Using Terraform to Provision your Everpure Infrastructure